Thursday 28 February 2013

Bangkok Phat Thai or Pad Thai


If someone told me that I could only eat one dish for the rest of my life it would be this, because every time I eat it is different I discover another flavour nook that I never noticed before. I suppose it is the thai equivilent to our fast food which would be our burger vans, that does embaress me somewhat because a Phat Thai is an art form, one that a hawker could spend their lives learning.
I spent nearly four months of my travels in Thailand, the reason I was able to spend such a long amount of time there was because it was so unbelievably cheap, the food was always delicious yet insanely reasonable and the rooms where always no more than five pounds. 
I loved the food in Thailand, it is everything that food should be, sweet, salty, sour, spicy, and aromatic. The philosophy behind the eating culture in Thailand is not how us westerners would approach dining, their is no set time to eat, you eat when you are hungry, it is very rare that people will sit down to a family dinner in their homes like most Westerners will do, instead they will go out to eat in open air food markets and the food is provided by Hawkers who specialise in one dish and one dish only, they will cook that dish their whole life until they perfect it. As a backpacker Phat Thai is the perfect dish, it is filling, yet cheap and packs a serious flavour punch. During my stay in Thailand I seldom ate in restaurants, I would usually find a hawker and a step to park my bottom and enjoy my food. 
 Phat Thai as it is known in Thailand or Pad Thai in the UK is stir fried noodles with tamarind, peanuts, fish sauce, sugar, the list goes on, but the one thing that I love the most about Phat Thai and most thai food in general that it is customisable to each individuals taste buds, for instance in the UK and most of the western world, condiments served with food are usually salt and pepper, that is it, whereas in Thailand you have dried powdered chilli, sugar, fish sauce with lime juice and birds eye chillies and usually a white vinegar that has chillies soaked into them the list goes on, this is why no two Phat Thai ever taste the same, they differ from one day to the next depending on your mood. Some of the best ever Phat Thai I have had have been along Khao san Rd in Bangkok, the women never wash their skillet, they merely wipe it, I presume that locks in all the flavour.

You will need:
125g of thin rice stick noodles commonly used in Vietnamese pho
75g of thinly sliced shallots
1 1/2 tbsp of white sugar
1 tbsp of tamarind sauce
50g of finely chopped garlic
2 tbsp of vegetable oil
50g of crushed salted peanuts
50g of julienned carrot (finely sliced)
50g of chinese chives cut into inch log pieces
2 tbsp of fish sauce
1 tsp of maldon salt
10 large kingprawns
2 eggs
a large handful of bean sprouts
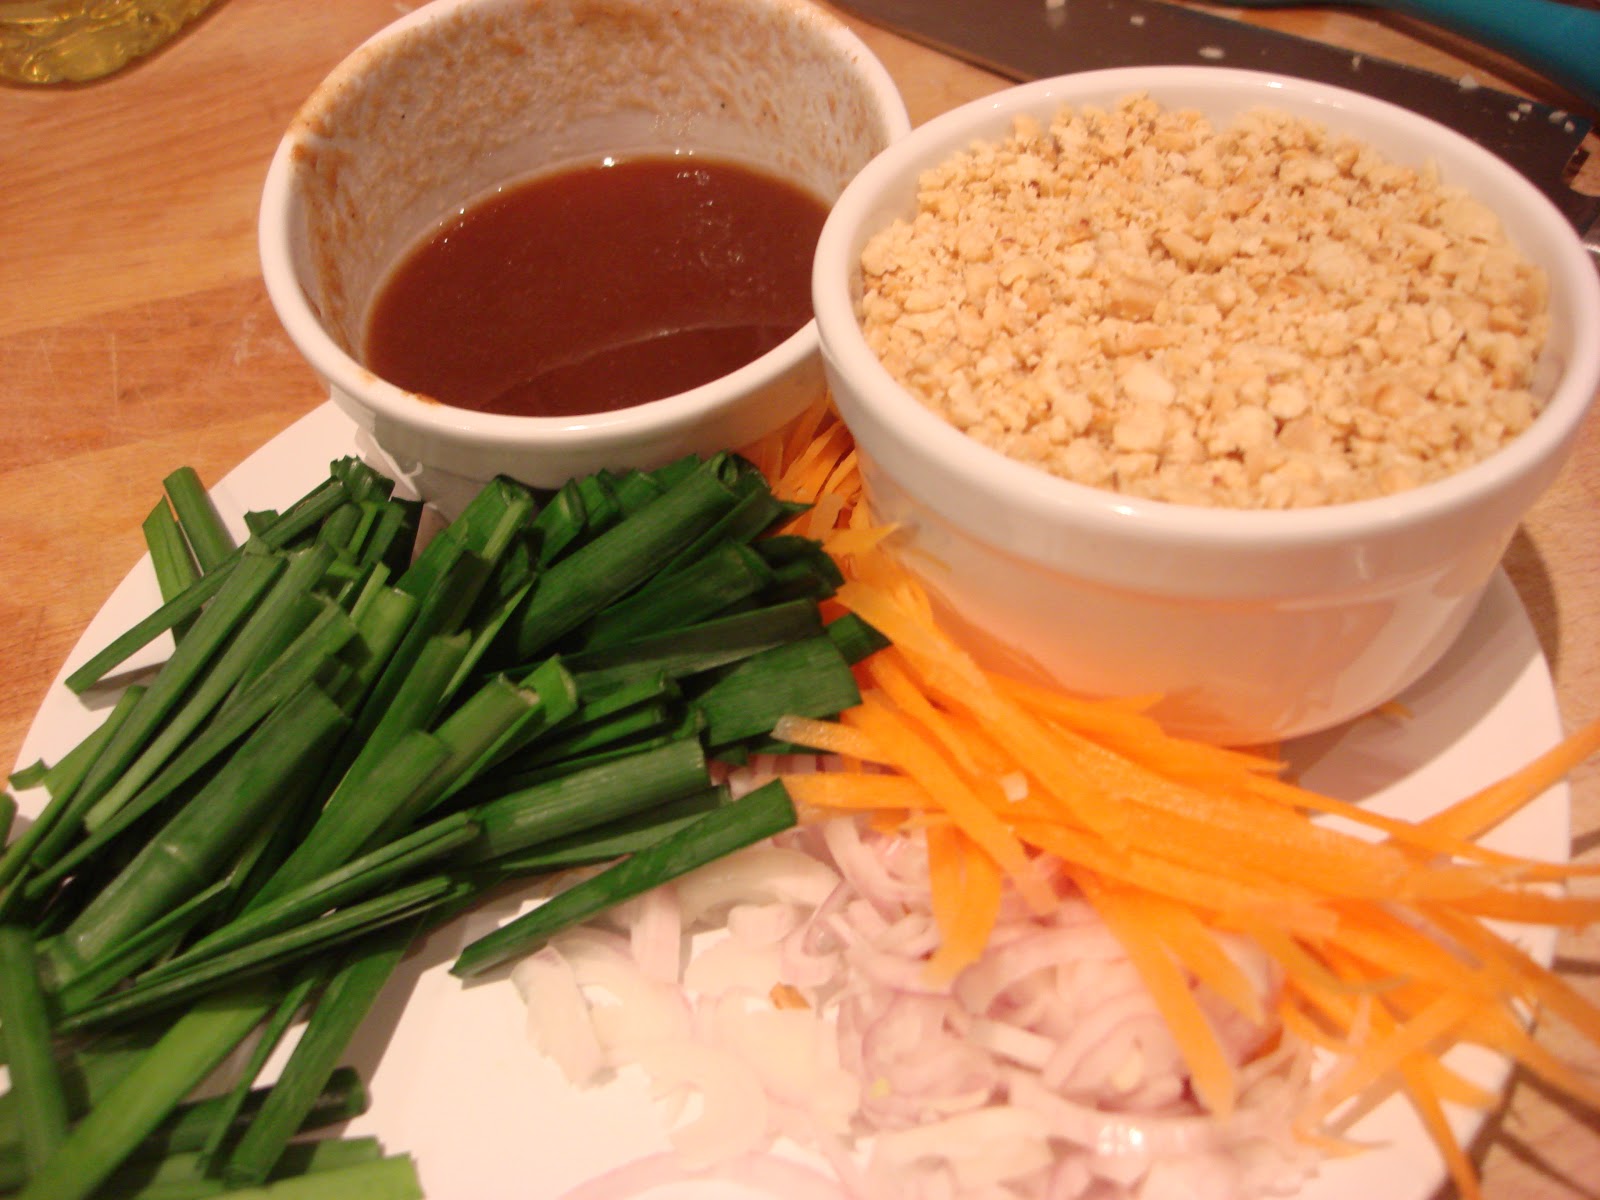
Firstly place the noodles in a bowl and pour boiling water over them until they are submerged, then leave until they soften. Place the chopped garlic into a small bowl and pour the oil over it, this is how I remember all the hawkers having their garlic. In another bowl mix the salt, fish sauce, sugar and tamarind into a bowl ready for cooking.
In a large frying pan or skillet heat the garlic and oil for a minute, add the shallots followed by the soaked and drained noodles and the prawns, when the noodles are slicked with the garlic and the prawns are starting to turn pink push all of the noodles to one side if the pan, in the other side of the pan crack two eggs into it and stir vigorously until you have scrambled eggs, then toss the eggs and noodles together. 

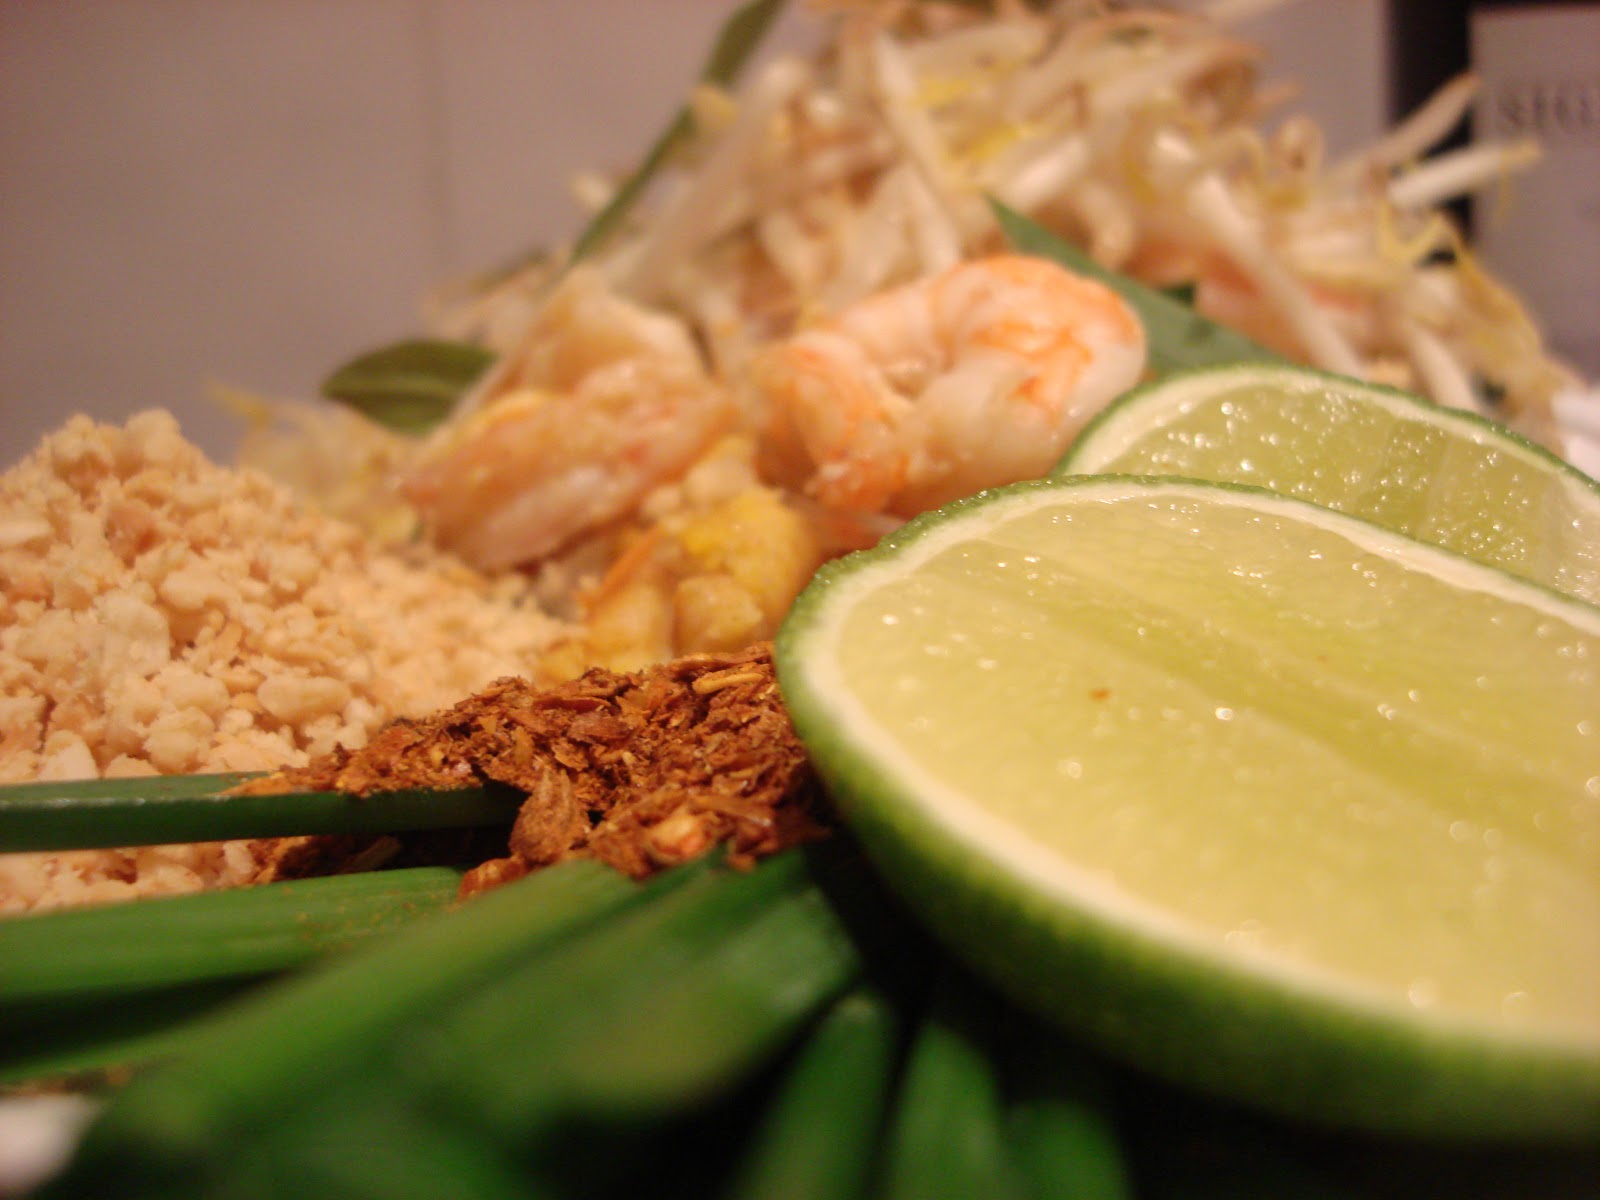
 Pour the tamarind mixture over the noodles and toss well, add the chinese chives and julienned carrot and cook for a further minute before removing from the heat and putting onto a plate. Place the bean sprouts on top of the noodles and serve with the crushed peanuts, sugar, wedges of lime and dried chilli powder on the side. Scatter a few Sweet basil leaves for an extra special taste

Tuesday 26 February 2013

The Ultimate Banana Cake


I love Banana cake, it brings me straight back primary school, my mother would pick me up and give me a warm foil parcel filled with banana bread, I think I fell in love with banana cake even more when I travelled through Australia in my early twenties, I had banana bread most mornings with a super caffeine charged espresso. I have spent along time trying to come up with the perfect banana bread, and I feel that I have achieved the perfect recipe, this is an adaptation of that recipe, this is banana bread on crack. It is almost a tarte tartin meets banana bread meets upside down cake, it was truly amazing, perfect for banana junkies. 

You will need:
200g of insanely ripe bananas, use totally blackened bananas
300ml of Soured cream
2 large free range eggs
200g of light Muscovado sugar
50g of caster sugar
2 tsp of ground cinnamon
1/2 tsp of ground Ginger
1 tsp of All Spice
1 tsp of vanilla extract
1 tsp of baking powder
1 tsp of bicarbonate of soda
1/2 tsp of cream of tartar
100g of melted butter
275g of self raising flour
1/2 tsp of maldon salt
50g of salted Almonds
100g of Dark chocolate 
1 tsp of plain flour

For the syrup base:
2 bananas
100g caster sugar
40ml of Amaretto 
1/2 tsp of maldon salt

Pre-heat the oven to 170 degrees c, line the bottom of a 9 inch spring form cake tin with a disc of greaseproof and butter the sides. In a frying pan heat the amaretto and caster sugar for the syrup until it is a golden brown colour, add the salt and swirl the pan to combine, do not stir this as it will crystallise. Pour the syrup into the cake pan and swirl it over the bottom of the cake tin until the base is fully covered. Cut your bananas (however you like) and place the banana onto the syrup until the base is covered.
For the cake batter mash the banana thoroughly and combine with the eggs, soured cream, cinnamon, allspice, ginger, vanilla, sugars, salt, baking powder, bicarb and cream of tartar together in a bowl and set aside until it bubbles. Meanwhile chop the chocolate and Almonds into rough pieces and toss in the teaspoon of flour until fully coated, this will ensure the chocolate and nuts will not sink to the bottom of the cake. In a small pan melt the butter until golden brown (this will add more flavour to the cake). Sieve in the flour to the banana mixture and fold it in carefully until just combined, then add the melted butter and floured chocolate and nuts. 
Do not over mix the batter, you will stretch the gluten in the flour which will toughen the cake up. Decant the batter onto the syrup and sliced bananas and bake in the oven for 30-35 mins until you can insert a skewer and it comes out clean. Invert the cake and dust with icing sugar.

Saturday 23 February 2013

Korean Belly pork with Kimchi


I'm sure you can probably gather by most of my posts that I love Asian food in all forms, I love how the simplicity of the ingredients can evoke such complex flavours. 
 I could literally spend hours in my local Asian supermarket, perusing the shelves to find new ingredients to test, Korean Pepper paste is one of my best finds, you can create sauces with it, or marinate meat to perfection with intense pepper flavour.
 I never need an excuse to feed my husband belly pork, he loves it in all forms, but this is one of the very first ways I cooked Belly pork and I will never forget the expression on his face, one of absolute satisfaction. 
 This recipe is made for those who can't cook or won't cook, it's a no brainer. Team this sumptuous meat with Kimchi, a fermented Korean cabbage flavoured with Korean red pepper flakes and you have a perfect dinner.

You will need:
2 kilos of belly pork with the bone in
2 tablespoons of Korean red pepper paste
2 tsp of sesame oil
2 tsp of sea salt.

Rub all of the sesame oil, salt and pepper paste onto the belly pork and cook for three hours, cook in a baking tray for thirty minutes at 200 degrees and then turn down the temperature to 160 degrease for a further two and a half hours. Leave the meat to rest and cut away the rind, it will protect the meat when cooking but will not crisp up, rub the top layer with the meat juices in the pan. Serve with Kimchi and steamed rice.

Thursday 21 February 2013

Punschrulle


 This divine treat for me sums up everything that it delicious about Swedish sweets, with one bite I am transported back to my childhood, my face firmly pressed against the window of a bageriet (bakery). When I was younger my mother was extremely strict about sweets, I was never allowed to much chocolate and would usually be rationed to a weekly treat, however when we would pay an annual summer visit to Sweden to see family friends and fill our suitcases full of contraband (cheese) , the sweet ration was always lifted, partly because my mother was brought up on these lovely goodies and wanted me to experience them, but mainly because she could not help herself either. Traditionally these lovelies are green, but I love colouring the marzipan blue, it fit in so well with my sons first birthday party.
 I would call this a Punschrulle, my mother calls it a dammsugare, which translates to vacuum cleaner because it is said no resemble it, I'm not too sure that it does, whatever you call it, it is by far one of the most delicious of the Swedish sweets and was always my pick of choice at the bakery.

Swedes are mad for marzipan and this boozy truffle filled roll flavoured with swedish Arrak or Punsch is then wrapped in the almondy good stuff before finally being dunked into rich dark chocolate on either end, sure you have to go for a run before you have one but it is worth it, the worst part is that one is never enough. 


You will need:
For the filling

250g vanilla biscuits
100g of melted butter
1 1/2 tsp of maldon salt
50ml of Swedish Arrak (if you cannot get hold of it substitute with more amaretto)
50ml of amaretto
200g of melted dark chocolate
6 tbsp of icing sugar

For the outer layer:
a pack of marzipan, coloured to the hue of your choice
200g of melted Dark chocolate
Icing sugar to dust the work surface so that marzipan does not stick.
Firstly place all of the biscuits into a food processor and blitz until they resemble fine bread crumbs. Meanwhile melt the butter and chocolate together in a pan over a low flame, pour the mixture into the food processor and then add the salt, booze and the icing sugar, place the filling into the fridge for at least half and hour until it is firm.
 Dust the work surface with icing sugar and roll out the marzipan until it is roughly half a cm thick, using the filling make a log shape all the way along the marzipan (yes it looks like poop), wrap the filling in the excess marzipan (see image), use a little water to help the marzipan stick and seal together. Slice 3 inch rolls, roll each roll delicately with your hands until they are inch this cylinders and then half them with a knife. 


Dip each end into melted chocolate and allow to set. 


Tuesday 19 February 2013

Ginger and Spring onion Pollock


There are times when a detox is necessary whether it is for body or mind, after indulging on all things comforting over the winter months there is nothing better than eating a meal that feels like a hug from the inside. I love Chinese food, and I'm not talking those gloopey bright red sauces rich in MSG, i'm talking about the most wonderfully simply and fragrant food. There is no doubting that ginger and spring onion compliment fish so well but it this particular recipe it brings the humble pollock to life. Sometimes it's the simple things in life that are so great, the bonus is that you do not have a guilty conscience afterwards.

You will need:
For the marinade

2 pollock fillets
2 tbsp sesame oil
3 tbsp of light soy sauce
50g of julienned ginger
3 spring onions finely chopped
2 tbsp of shaoxing rice wine
1 tbsp of caster sugar
1/2 tsp of salt 

For the sauce:
4 tbsp of the broth from steaming the fish
2 tbsp of garlic
2 tbsp of sesame oil
2 tbsp of ginger
2 spring onions (green part only)
4 tbsp of good oyster sauce
2 tbsp of caster sugar
1 tbsp of light soy sauce
100ml of water
1 tsp of corn flour

Place all the marinade ingredients into a small bowl or foil parcel, one that can fit into either a bamboo steamer or conventional steamer.
 Allow the fish to marinate for at least ten minutes. Steam the fish in the bowl full of marinade for roughly ten minutes (depending on the size of the fish) the flakes will separate  very easy when cooked. 
To make the sauce fry the garlic, ginger and spring onions in the sesame oil, add 4 tablespoons of the broth from cooking the fish and the oyster sauce, sugar and soy sauce. To finish stir the corn flour into a 100ml of cold water and add it to the pan, it should take no more than a minute to thicken the sauce. Remove the fish from the bowl and pour the sauce on it, serve with steamed white rice.


Friday 15 February 2013

Chicken and Chorizo Paella


 I have cooked a fair few Paellas, most of which are usually Seafood based so this came as a welcome change, especially in the winter months when all you want is a warming bowl full of loveliness. The idea from the recipe comes from the Spanish Kitchen in Beverley who specialize in fantastic quality spices and authentic Spanish cookware, unfortunately I am yet to purchase a true Paella pan but this dish works so well with a frying pan, an item in the kitchen that I suspect most of you will have. As per usual I have tweaked the recipe to achieve maximum flavour from my ingredients. For those of you who have not tried Chorizo yet I urge you to try it, it brings life to the most bland food, quality does tend to vary.
 I was fortunate enough to get hold of authentic Spanish Chorizo from Brindisa at Borough market, if you can get hold of the real Mc coy it is definitely worth the extra money. I have also used Chicken thighs on the bone because there is so much flavour in the bones it would be a total travesty not to get the most out of that. This is a dish to be enjoyed on a cold evening with a dollop of aioli and a huge glass of Rioja. Heaven!

You will need:

250g of Bomba paella rice
200g of fresh chorizo picante
4 large chicken thighs with the bone in, cut in half
1 red pepper cut into strips
2 tbsp of olive oil
500ml of fresh chicken stock (readily available at all supermarkets, homemade is better)
1 tsp of freshly chopped oregano
0.4g of saffron strands
3 finely chopped shallots
2 tsp of spanish sweet smoked paprika
50g of finely chopped garlic
12 halved cherry tomatoes (they are sweeter and break down quickly)
1 tsp of salt
4 tbsp of frozen peas
4 tbsp of chopped parsley
the juice one a quarter of a lemon


In a large Frying pan start by frying the shallots and peppers in the olive oil, when they are starting to soften add the chorizo, when the chorizo has leaked its ruby oil into the pan fry the chicken thighs in the oil to soak up the flavour of the chorizo.   Add the paprika, chopped oregano and chopped garlic, when the garlic has softened and mellowed add the rice and allow each grain to become slicked with the chorizo oil.
 In a saucepan heat the stock until simmering and add the saffron into the stock to extract maximum flavour from the strands. Pour the hot stock onto the rice and add the cherry tomatoes and the salt, give it one last stir. 
Allow to bubble gently for 20-25 mins with a piece of parchment paper on the top to help the rice to cook evenly, do not worry if a crust if beginning to form on the bottom that is supposed to happen and is often the most prized part of a paella to most spaniards. 
When the rice has cooked turn off the heat and stir through the peas and parsley, lastly spritz the grains of rice with the lemon and serve with a huge dollop of aioli.