Showing posts with label Delicious Dinners. Show all posts

Sunday, 8 June 2014

Salt and pepper Squid


 I love seafood in all of its guises, you name it i'll eat it. It's funny I could probably live my life happily as a vegetarian, but seafood would be the chink in my armour, I know a lot of vegetarians who have fallen off the wagon purely from the smell of cooking bacon, well seafood cooking for me is like my bacon, I cannot resist it.
 Squid is one of those funny things that people are absolutely petrified of, they do not know how to deal with it, granted it is probably not the most approachable or aesthetically pleasing, however it is a very easy thing to prepare and even easier if you have a fabulous fish monger who will do it for you. I think that for a lot of people squid is probably associated with terrible european all inclusive holidays, where calamari probably serves a greater 
purpose as a hair bobble than an appetising dish. Squid is so underrated and is so delicious when cooked properly, it either has to be cooked very quickly on a very high heat or cooked low and slow for a long time. Salt and pepper squid is one of those fabulous dishes that unfortunately has somehow gotten lost in translation, we have managed to westernise a dish that is pure perfection in its own right, much like carbonara, pizza, korma, you name it, us brits have somehow managed to destroy the integrity and origins of the dish. I happen to think that salt and pepper squid when cooked in this wonderful way could even sway the most squeamish of folk. It is so very simple to do and unbelievably delicious, if my husband can make this recipe anyone can, I urge you to try......

You will need:
400g of cleaned squid, the tubes scored and beaks removed from the tentacles 
1 1/2 tbsp of shaoxing rice wine
3 eggs beaten
12 tbsp of corn or potato flour
12 tbsp of plain flour
1/2 tsp of sichuan pepper corns
1 tsp of black pepper corns
2 1/2 tsp of maldon sea salt
600ml of vegetable oil to fry
4 tbsp of chopped garlic
4 tbsp chopped spring onions, both white and green parts
2 large chopped red chillies
2 large chopped green chillies

 The first thing to do is to clean and prepare your squid, score the tubes in a diamond fashion but do not cut through the squid, but each tube into three, remove all beaks from the tentacles, if you have a great fishmonger they will do it for you. Once the squid is prepared place it into a bowl and allow it to marinate in the rice wine for 15 minutes. Meanwhile prepare the crispy coating for the squid, place the plain flour on one plate, in a bowl whisk the eggs until fully mixed, lastly place the corn or potato flour onto another plate but add the salt and both types of ground peppercorns (please freshly grind them, even better if they are toasted first), mix the seasoning into the flour thoroughly.

 Heat up the oil, then dry the squid onto kitchen paper. Firstly dip  each piece of squid into the plain flour, then the egg followed by the seasoned corn flour, then straight into the hot oil, it should take only a minute to fry the squid but try not to overcrowd the pan as it will reduce the heat in the oil. Place the cooked pieces of squid onto a kitchen paper until they are all cooked. Drain away all of the oil from the pan apart from 2 tablespoons and then fry the aromatics, garlic, spring onion and the chillies until they a softened and smell delicious, quickly toss in the squid and coat with the aromatics. Turn of the heat and serve immediately.


Sunday, 11 May 2014

Wild Garlic and pea Risotto


 I have to apologise profusely to my followers and regular readers, I have temporarily been on hiatus from blogging for a while, it's nothing personal, I have just been gathering a plethora of fool proof recipes before blogging, whilst running a kitchen at work and also becoming food ambassador for my area for the Jamie Oliver's foundation, so you could say that officially all my balls are in the air (excuse my lewdness)! At the start of the year I decided to spend the first month being dedicated to vegetarianism, it was a kind of cleanse after christmas, Christmas is usually a carnivores delight and I tend to become fed up of meat by january, this definitely changed my outlook on food and made me appreciate the fact that meat should be a treat and treat with respect, since then I have eaten mostly vegetarian food. Am I a vegetarian? No, absolutely not but I do feel that if we are willing to kill an animal for our consumption the very least we can do it give the animal a great life before D day. 
 The best part about our vegetarian challenge is that it automatically requires you to think outside of the box, it is all too easy to concoct a meal consisting of meat and two veg, after all we are a meat and two veg nation, a vegetarian meal require a little more thinking. 
 Currently wild garlic is in abundance in the UK and it is one of those things that most people have never tasted which I think is a real shame, in the UK we have some of the most amazing produce growing wild right on our doorstep, but due to lack of knowledge or enthusiasm we do not feel comfortable picking or foraging our own food unless it comes in a uniform plastic package!! Food never tastes better than when it is free and when you have personally picked it yourself. Wild garlic is one of those things that actually tastes even better than you imagine, the flavour is totally addictive, and works so well in my wild garlic and pea risotto.

 Please note that risotto is not a flipping side dish, it is the main dish. I believe it was Rick Stein who visited Italy and asked a local cook what was in the risotto and she replied "really good stock". That sums it up for me, great food is uncomplicated, it is about the stock and the stunning wild garlic. 
 I want to dedicate this recipe to Daniella Patrizi, our friend from afar, who inspires my love for Italian food on a daily basis, and is an avid follower of my wonderfully talented Husband Mark, this ones for you Dani.

2 large echalion shallots finely chopped
1 sticks of celery finely chopped
1  large garlic clove finely chopped
1 litre of chicken stock, if it is mild add two tsp of maldon sea-salt
50g butter to fry
1 tbsp olive oil
200g carnaroli rice
170 ml very dry white wine
75g of good parmesan
10 wild garlic leaves finely sliced
1/2 cup of frozen or fresh peas 
50g extra butter to finish
2 tsp cracked black  pepper

 Finely chop the shallots, celery and garlic and cook in 50g of butter and the olive oil until translucent.  
 Place the stock in a pan and keep in on a simmer, you should never add cold stock to the risotto. 
 Once cooked add the rice and cook the rice smells aromatic but not golden, immediately add the wine ad stir constantly until the wine evaporates.
 Add the stock a ladle at a time on a medium heat ensuring that each ladle has being absorbed before adding the next ladle of stock.
 Keep stirring with a wooden spoon, when all of the stock is absorbed add the remaining 50g of butter, the parmesan, peas and wild garlic.
 Immediately turn of the heat and continue to stir, add a little cracked black pepper and serve immediately, the texture should be a soft oozy plate of rice and NEVER a firm ball of rice.


Tuesday, 4 March 2014

Sunshine Pancakes


 When it comes to tradition I am always a non conformist, with Shrove tuesday rapidly approaching us I devised a task to come up with an amazing alternative pancake recipe. I thought back to my days in New Zealand where I remembered having a sweetcorn fritter crossed with a savoury pancake, it was totally delicious, my alternative Pancake was born. I know that a lot of people are not necessarily pancake lovers and a savoury pancake would be a welcome change for most. I always associate Sweetcorn with summer time, bbq's, and mexican food, hence the name sunshine pancakes. The Pancake batter packs quite a punch, if you are not a chilli lover just leave them out.
 This was a total success without a shadow of a doubt, so much so that I converted my pancake hating husband to love them. In my Pancake recipe I place half a prawn on top of each one so that it cooks into the batter, if you do not like prawns you can place a couple of slices of chorizo instead, if you are vegetarian just cook the batter, the possibilities are endless.

You will need:
(for the batter)
200ml of whole milk
2 large free range eggs
150g of self raising flour
75g of maize flour or polenta
1 tsp of baking powder
2 tbsp of caster sugar
2 1/2 tsp of maldon sea salt (must be maldons, table salt is too harsh)

For the vegetables:
2 finely chopped fresh green jalapenos
1/2 a red pepper finely diced
1 small red onion finely chopped
2 fresh corn on the cob with the corn removed (see below image)
1 tbsp of chopped garlic
1 tsp of cumin powder
1 tsp of paprika
50g of butter
1 tsp of maldon sea salt
4 tbsp of chopped coriander
between 6-9 raw tiger prawns (depending on the size of your pancakes)

To remove the sweetcorn from the husks place a smaller bowl upside down inside of a larger bowl, prop the bottom of the corn onto the bowl and slice the sweetcorn off by running the knife down the side of the husk, the sweetcorn should fall into the bowl.
Melt the 50g of butter in a frying pan and fry the onions, pepper and the jalapenos until they are softened, add the paprika, cumin, chopped garlic and sweetcorn, season with a tsp of salt and cook on a low heat for five minutes. Remove the vegetables off the heat and stir in the coriander, allow this mixture to cool thoroughly. Meanwhile prepare the pancake batter, sift all of the dry ingredients into a bowl, whisk the eggs and milk together and add this to the dry ingredients, whisk until just combined but smooth. Add the cooled vegetable mixture to the pancake batter and mix until fully combined.
 Fry a couple of dollops of the batter to make up one pancake in a frying pan with a little melted butter. 
Place a prawn half (split lengthways) onto the top of the uncooked batter, when bubbles begin to appear on the surface flip the pancake, it should only take a few minutes either side. Serve with Sweet chilli sauce!

Wednesday, 2 October 2013

Authentic Italian pizza, the way it should be


The misconceptions of authentic cuisines are rife in the uk, like the recipe magpies that we are, we borrow a great dish from a country in which their cuisine has made an impression on us, then we adapt it to our British palate, now in theory this may seem like a good idea at the time, but years after we have borrowed such dishes and now made them our own it means that the UK's top ten favourite foods now consist of tikka masala, stir fries, spaghetti bolognese and pizza sigh....
This is why I have decided to go back WAYYYY back, to the land where pizza originated, Italy, the one place where pizza remains the harmoniously humble meal it always has been, where the key is not too load hideous toppings of beef burgers, donner meat or an inch of melted plastic cheese, but it is all about the base and toppings are kept to a minimum, tomato, mozzarella and basil, the colours of the Italian flag. I know that we don't all have wood burning ovens in our back gardens, but there are ways to get around such obstacles, we can recreate culinary heaven. A lot of recipes that I have researched are very quick to do but by allowing your dough a little time to ferment the flavours of the dough develop significantly, some call for 72 hours of slow rising in the fridge but I have tried this and truly feel that you can get the same results by leaving the dough for eight hours at room temperature.Humour me if you will, I came, I tried and I think I conquered what is true and splendiferous about the great Italian pizza.

1kg 00 flour
2 tbsp Maldon salt, if it's table salt use half the quantity
6 tbsp of extra virgin olive oil
600ml lukewarm water
2 tsp dried fast action instant yeast
3 tsp sugar

Place the flour in a large bowl, electric mixer with a dough hook or pour it directly onto the work bench, add in the salt and mix the salt through the flour. In a jug measure out 600ml of blood temperature water, you should be able to dip your fingers into the water and not notice a temperature change. 

Add in the sugar and yeast and allow the yeast to dissolve, mix the water into the flour and salt, when you have a rough dough add the olive oil to the dough and then knead the dough for 10-15 minutes until the dough becomes elastic and stretchy, place the dough into a large container or into a bowl covered with cling film, let it rise for 8 hours at room temperature. 
 Meanwhile make the passata.

You will need:
6 large plum tomatoes
A tbsp of extra virgin olive oil
A tsp of Maldon salt

Place everything into a pan and cook the tomatoes until they break down entirely! Allow to cool.

Get your toppings ready.
For pizza neapolitana I have buffalo mozzarella that has been well and truly dried, fresh basil, grated pecorino (it's a personal preference I prefer it to Parmesan) and the passata.


N'duja pizza, this is my favourite, a few blobs of Calabrian chilli spiked n'duja sausage, fresh mozzarella, black olives, pecorino cheese and fresh basil.
The last pizza was a prawn and garlic pizza, king prawns, freshly chopped garlic, oregano, mozzarella and pecorino.

I know what you are thinking, how can you replicate the cooking of a wood burning pizza oven, you cannot replicate it but you can get very very close. Either use a cast iron flat grill, or turn a cast iron pan upside down, heat the oven as hot as it will go with the cast iron pan inside for at least half an hour.
This dough made six wonderful pizzas.
 When the dough has risen divide the dough into six, on a very floured surface with a handful of semolina in the flour to soak up the moisture, start by using your finger tips flatten the dough into a disc, you can then pick up the dough and rotate it letting gravity do it's work, it will stretch the dough but will still leave a lip around the edge.
 These pizzas must be thin, never thick, each dough ball should stretch to roughly 10-12 inches.
 Remove the cast iron pan from the oven and working quickly place the disc onto the pan, spread a thin layer of tomatoes, and then top with your choose toppings, no beef burgers or donner meat allowed! Cook the pizza in the Oven for 6-9 minutes until the base is crisp and the cheese has melted. Serve immediately.

Happy Little boy


Tuesday, 24 September 2013

Sichuan Twice cooked belly pork (Huí Guō Ròu)


 A 2012 survey conducted in the UK confirmed that Britain's favourite meal was a stir fry, yes you read me right a stir fry. I'm not entirely sure what the heck that means in all honesty, to me a Stir fry is not a dish but a cooking method.
 Unfortunately real Chinese food in this country is extremely difficult to find, us Brits associate Chinese food with gloopey bright red sweet and sour sauces, and the very westernised Chow mein, that I can only presume is an invented western version of Chinese bubble and squeak. In Chinese culture gastronomy has always been highly regarded, they pride themselves on eating a wide variety of foods, whilst still keeping true to the traditions of their food culture, I often wonder what they think to our adaptations of their prized cuisine.

 I first tried this wonderful dish with my husband, we had stumbled by a restaurant that was very dark and dingy, and full of homesick Chinese students which I suspect where missing their home cuisine. You know when you are eating somewhere authentically Chinese when you are a)The only westerners there b)the menu is not in English and you have to point to an image c)you can hear the gently clattering of tea cups and a murmur of mandarin tongue. This is when I know I am on to a good thing. 
 My husband being the very smart man he is always leaves it up to the waiter to recommend an authentic dish and this is what were served, Huí Guō Ròu simply means returned to the pot, meltingly tender fiery strips of belly pork cooked with ramps, leeks or baby leeks. At first glance it seems as though replicating a dish like this is utterly incomprehensible, but it was actually much easier than I thought, and was utterly delicious. This is one for all you chilli lovers out there.

You will need:
1 1/2 kg pork belly
3 red chillies
5 baby leeks
3 tbsp Sichuan chilli bean paste
1 tbsp tian Mianjiang or hoisin sauce 
1 tbsp black bean paste
2 spring onions (dark green part only)
1 tbsp veg oil
2 tsp sugar
1 tsp soy sauce


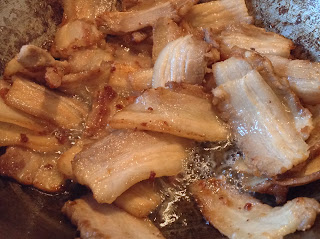
This dish is far to easy to make, the only complicated step is the twice cooking of the pork and that is really a doddle! Place the pork in a very large pan of boiling water  so that the water covers the pork and boil for 25 minutes, remove from the pan and refrigerate overnight, this will allow the fat to solidify making it easier to slice. 
The following day slice the pork belly as wafer thin as you can manage and set to one side. Make sure that you slice your ramps (or leeks) chillies and spring onions so that you are ready to go, this really helps when cooking Chinese food.
 Firstly heat the oil in a wok until it is smoking hot, then stir fry the pork only, until each piece is slightly crisp and golden, it will also help to render the fat of the pork. Remove the pork with a slotted spoon from the wok and let it drain slightly in a colinder, you don't want to remove all the fat but too much is not good either so a little can be drained away with the meat.
 To the residual oil add the chili bean paste, tian Mianjiang, black bean paste, sugar, chillies and soy, allow this to cook for a minute before returning the pork back to the pan with the leeks and spring onions, allow all the ingredients to cook together for a couple of minutes until the leeks are just softened, serve immediately on clouds of fluffy steamed rice!
 Heaven on earth.