Friday 30 November 2012

Swedish Wienerbröd


Nothing reminds me more of long summers in Sweden like a huge Vienerbrod. To most people this will be a vanilla danish pastry, but unknown to most the Swedish bakeries are without a doubt some of the best in Europe. My Cousin Kim worked in a Swedish bakery so when he came to England for the first time, we took him into our local bakery, he was truly horrified. I do think that we are getting moderately better but we do have some way to go yet. As a child I loved my holidays to Sweden with my mum, to say that she was a very health conscious parent would be an understatment, chocolate was never eaten in abundance, however when we went to Sweden my mother too turned into a big kid and wanted to indulge in the sweet treats just as much as I did. Every day we would visit the local Lake called Frostvallen and have a pack up of open sandwiches, with pate or cheese followed by sticky Vienerbrod. The recipe seems complicated but it is not, it is a little time consuming. I always do my baking on a rainy Sunday, without a care in the world.

You will need:
For the pastry
250ml of whole milk
3 tablespoons of sugar
50g fresh yeast
a pinch of salt
1 XL egg
400g flour
300g of frozen butter

Firstly mix the milk, yeast and sugar together, make sure the milk is cold, normally when dealing with yeast I would use tepid milk, however you must make sure that all components of the pastry are cold so that the butter will not melt into the pastry and can be folded into it in layers, this is what will create the layers in the pastry and the light crisp texture. 
In a mixing machine or a large bowl add the flour, salt and egg, followed by the yeast and milk mixture, mix with a dough hook attachment for five minutes or by hand for 10-15 minutes, then place in the fridge to rise for an hour.
Slice the butter into cm thick slices and lay it onto a sheet of grease proof in one large sheet of butter until it is one block rough 20cmx20cm and 1cm deep. Place the butter in the freezer and allow to become really cold.
When the dough has risen, roll it out into a rectangle roughly 25cm by 40cm, place the frozen butter onto one half of the pastry, fold the other half of the dough over the butter and fold over the edges so you are making a tight parcel encasing the butter.
 Roll the pastry with the butter inside of it into a rectangle roughly 50cmx20cm, this is very difficult and requires a lot of muscle.
 Fold the pastry into thirds by pulling one side of the pastry a third of the into the rolled out pastry to create a fold, then fold over the other side to meet the folded edge of the pastry, it is very similar to folding up a brochure, then fold this in half (doubling it over see pictures). Roll out the pastry until it is roughly 50cmx 20cm once more and repeat the folding process.
 Wrap the folded pastry in cling film and place in the fridge for at least 30 minutes. When the pastry has rested, chilled and risen repeat the folding process a further 3 times making sure that you always fold the pastry the same way so you create layers that will puff up, do not worry if you can still see butter running through the pastry that is a good thing. Repeat the process of folding and chilling in the fridge a further 5 times before.
Whilst the pastry is chilling you can make the vanilla cream filling, which is similar to the french creme patisserie.

You will need:
500ml of milk
2 tbsp of corn flour
3 tbsp of vanilla sugar
3 tbsp of caster sugar
one vanilla pod, split and with the seeds scraped out
1 tbsp of vanilla extract
4 egg yolks
Place the milk and the flour into a pan and allow the flour to dissolve, it will never dissolve in hot milk so the milk should be cold, add the sugars, vanilla pod and vanilla extract. Cook the milk on a very low heat constantly stirring until the milk becomes infused and thickened like custard. With a whisk at the ready add the egg yolks into the thickened milk and whisk like crazy, keep whisking with the pan on the heat for a further five minutes until the mixture is smooth and thickened.    
Pass the vanilla cream through a sieve, place a piece of cling film directly onto the cream so that a skin does not form, allow to cool in the fridge.
Preheat the oven to 190 degrees c
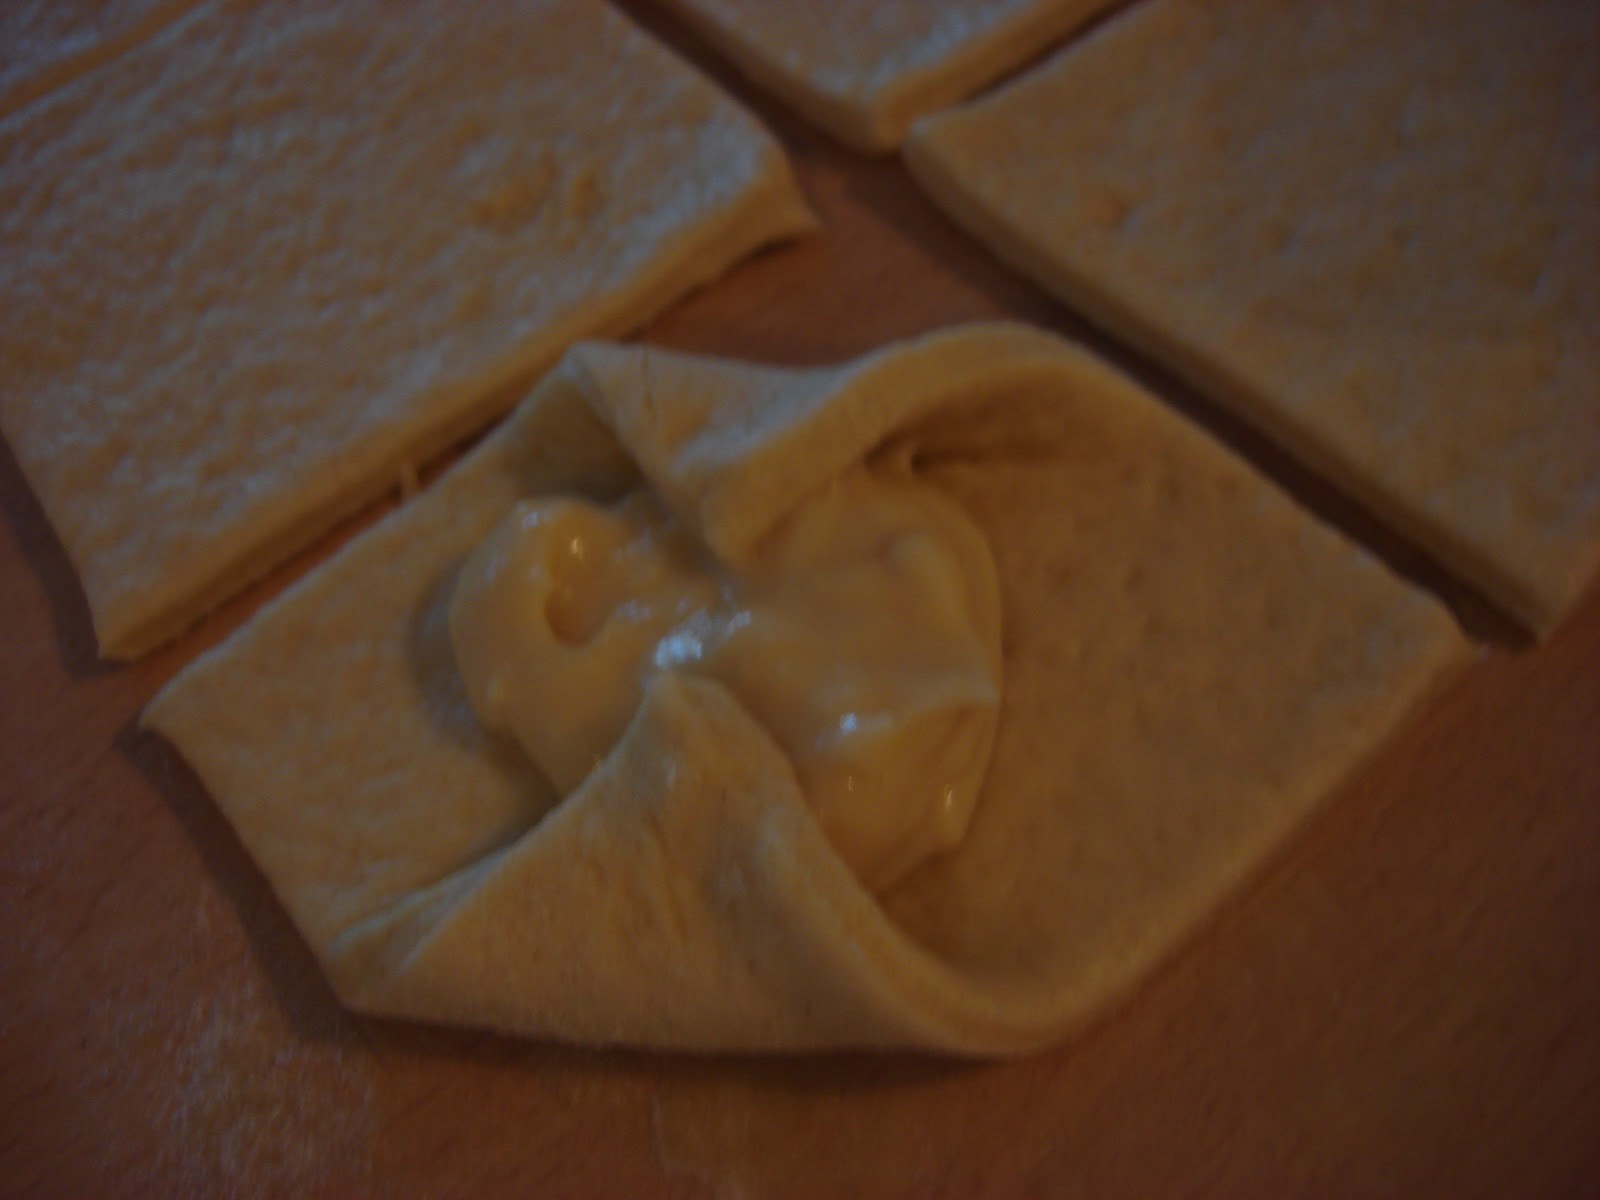
Roll out the pastry and cut into 10cm x 10cm squares, place a dollop of vanilla cream in each square and fold in the corners so that the square becomes a diamond, brush the edges with egg wash and cook in the oven at 190 degrees c for 15 minutes or until golden.
 Once the pastries have come out of the oven, brush the edges with runny honey, sprinkle the middle with freshly chopped almonds. When the pastries have cooled thoroughly drizzle with a little running icing, mix five tablespoons of icing sugar with one tablespoon of water, mix until it is the consistency of runny honey.

Saturday 24 November 2012

Poussin with Chorizo and Cornbread stuffing


I saw a version of this recipe on "The best thing I've ever made" on the food network, it was cooked by a Mexican chef called Aaron Sanchez. There were a few ingredients that he used that I could not get hold of, such as a Cornish hens and various chillies indigenous to Mexico, so I used my head and my cooks instinct and adapted the recipe to encompass ingredients that are readily available in my local supermarket. 
 I had watched this recipe being cooked quite a long time ago but had never got round to testing it, but because I had some fantastic cornbread left over from our chilli con carne extravaganza I now had the perfect excuse to test it out. I have used Poussin in this recipe but this would work very well with a large corn fed chicken, or if you are totally sick of the same old Christmas sage and onion stuffed turkey recipe, double the stuffing and spice up your Christmas. Serve this with roasted butternut squash, red onions and red peppers and some wonderfully peppery rocket. I'm so glad I tested this recipe, I salute you Aaron Sanchez!

You will need:
2 corn fed Poussin's
75g of chopped red onion
100g of chopped shallots
25g of chopped garlic
25g of butter
2 tsp of fresh oregano
125g of soft fresh chorizo
1 tbsp of olive oil
1/2 tsp of cumin powder
1/2 tsp of sweet smoked paprika
1/2 tsp of chipotle chilli powder
275g of crumbed cornbread
1/2 tsp of maldon salt
2 tbsp of chopped corriander

For the glaze:
1/2 tsp of cumin powder
1/2 tsp of sweet paprika
1 tsp of chipotle chilli powder
the juice of one lime
1 tbsp of olive oil
1 tbsp of honey
1 tsp of maldon salt

Preheat the oven to 180 degrees c.
In a large frying pan melt the butter and olive oil for the stuffing in the pan and fry the shallots, red pepper, oregano, cumin, chilli powder, paprika and crumbled chorizo.
 Fry until the peppers and shallots have softened and the chorizos oil has seeped into the vegetables. Add the chopped garlic and fry for a couple of minutes until the garlic flavour has softened but not browned. Add the crumbed cornbread and coriander and mix well, season with the salt and remove from the heat to cool.
When the stuffing has cooled fill each Poussin with the stuffing until almost full, it needs to be loosely packed so that the heat can circulate inside of the bird.
Skewer the cavity of the bird shut. mix all the ingredients for the glaze in a bowl and then rub over the Poussin's.

Cook in the oven for 40-45 minutes. Leave to rest for 10 minutes before serving. The best way to check to see if the Poussin is cooked is to cut the skin where the leg and breast meet and if the juices run clear it is perfect.

Thursday 22 November 2012

Mushroom and Truffle Risotto


I recently paid a visit to Borough market in London, I have to say I was outrageously jealous that Londoners have this amazing market on their door step. Unfortunately my husband could not join me as he was looking after our son, so I decided to pick up a few items at the market so I could spoil him rotten, hopefully that would make up for him missing out on all the fun. I noticed there was a stall selling black truffles so I could not pass up the opportunity of getting one in the hope that it would intensify my mushroom risotto recipe. It worked a treat and after my husbands third helping he finally surrendered to the limit of his stomach. It was a resounding success. 
 If you cannot get hold of a black truffle do not panic, you can get truffle oil pretty much anywhere now, and I know that black truffles are not necessarily at the top of everyones grocery list. The truffle I bought was five pounds but will serve four people happily so a little goes a long way. Most people are frightened of making a risotto, but I think it is one of the easiest things to make, a true one pot wonder. Rick Stein put it so wonderfully when he spoke about a risotto that he has had in Italy, he asked the waitress what was in the risotto and she said we have some very good stock, this is what truly sets apart an OK risotto from an outstanding work of art. Calling all mushroom lovers, this one is for you.
you will need:

For the mushrooms:
250g of sliced fresh Porchini mushrooms
150g of brown beech mushrooms
150g of enoki mushrooms
175g of chestnut mushrooms
50g of butter
25g of chopped garlic
2 tsp of maldon salt
1/2 tsp of black pepper
100ml of dry white wine (if you dont want to drink it do not cook with it)
2 tbsp of olive oil

In a very large frying pan sautee the mushrooms in the oil and butter, add the garlic and allow to cook for a couple of minutes, add the salt, pepper and white wine and allow to cook until the wine has almost evapourated. Set these mushrooms aside for later.

For the Risotto
75g of butter, save 25g of the butter for later
1 tablespoon of olive oil
25g of garlic 
250g of carnaroli risotto rice
100g of celery
150g of white onion or shallots
200ml of white wine
1 tablespoon of freshly chopped oregano
2 1/2 pints of really good chicken stock or vegetable stock if you want to make it totally vegetarian
1 tsp of grated truffle
2 tbsp of mascarpone cheese
1 tsp of  maldon salt
1/2 tsp of  freshly cracked black pepper
50g of grated parmesan
25g of chopped basil

For the risotto start by frying the onions, oregano, celery and garlic in the butter and olive oil, fry this on a low heat until the onions are translucent. Add the rice and fry the rice until the  outside becomes translucent. Add the wine immediately and stir continuously until the alcohol smell from the wine has been burnt off and the wine has almost evaporated. The trick with making a good risotto is ensuring that your stock is hot, this will make your life so much easier. Add a ladle full of the stock, one at a time and continuously stir until the liquid had been absorbed by the rice, keep doing this until there is no more stock left, by this point the rice will be perfect. Finish the rice with the 25g of butter, mascarpone cheese, parmesan, salt, pepper, the grated truffle, chopped basil and finally the sauteed mushrooms that had been previously set aside. Stir well.
Serve immediately.

Cornbread


Corn Bread: The perfect accompaniment to my chilli recipe. I absolutely love how the sweetness works so well with the savoury spice of the chilli con carne. If you have never tried cornbread you have to give it a go because you are missing out. 

You will need:
2 large eggs
200ml buttermilk
120g sugar
50g of melted butter
200g of polenta (not ready mixed that's just silly)
200g of flour
1/2 tsp bicarbonate of soda
1 1/2 tsp of baking powder
100ml of whole milk
50g of grated parmesan
2 tsp salt
1/4 tsp of cumin powder

Preheat the oven to 180 degrees c.
Use either a silicone cake pan or grease and line a 20cm x 20cm cake tin. This is easily made into individual muffins if you prefer.

Add all of the ingredients into a bowl and mix until just combined, pour into the tin and bake for 30-35 mins.

Guacamole


Guacamole is one of my favourite things to eat, if you are crazy about avocados like I am there is no better way to eat avocados than in a lovely chunky guacamole. This is super simple to make even a child could do it, it may be a little messy but isn't that what is fun about cooking? I digress, I would have to put my neck on the line and say this is probably one of the best dishes of mexico.

You will need:

1 tsp of maldon salt
2 tbsp of chopped corriander
1 green chilli
2 large ripe avocados
1/2 tsp of sugar
1/4 tsp of cumin powder
the juice of one lime

Using the salt as an abrasive pound the chilli until it is a paste, then add the avocado. Mash the two together until they are a chunky paste, then add the lime juice, sugar, cumin and chopped corriander. Mix until combined, dig in and enjoy.

Monday 19 November 2012

My Chilli Con Carne


Every good cook has that one stand out dish that they know is an outstanding success, the one that is a huge crowd pleaser and makes anyone who eats it mmmm and ahhh with satisfaction, whilst their eyes roll back into their head. You know you have done well when two helpings is not enough and your family sit in utter silence with wonderment, and even though they still have half of their chilli left they are still looking at the pan in hope that there may be more. This is my go to dinner, I can make it in a hurry and it never fails to please. Someone once said to me that it is very easy to make a chilli, but it is very hard to make a great chilli and this is too true. This is completely packed full of flavour and has a great bite to it. The difference with my chilli is that I love a smoky aroma to it and that can only be done with chipotle chillies, these are smoked jalapenos, and if you take your chillies very seriously as I do, it is worth buying these because they transform any chilli into a revelation.

You will need:

575g of lean beef mince
250g of chopped red onion
100g of chopped green pepper
100g of chopped red pepper
2 finely chopped green chillies
4 tbsp of olive oil
50g of garlic crushed in a pestle and mortar with 2 tsp of salt
1 tin of tomatoes
100g of brown sugar
500ml of water split into two
1 tbsp of white vinegar
1 tin of kidney beans
1 tbsp of cumin powder
2 tsp of chipotle chilli powder (if you cannot get this use chipotle en adobo in a jar)
2 tsp of sweet smoked paprika
2 tbsp of chopped fresh oregano
1 tbsp of green jalapeno hot sauce
1 tablespoon plus 1 tsp of maldon sea salt
1 tbsp of 100% cocoa solids dark chocolate
the juice of 1 lime
150ml of soured cream
5 tbsp of freshly chopped corriander
1 tablespoon of maize meal flour (optional)

Preheat the oven to 180 degrees c.
In a large heavy based cast iron pan fry the onions, pepper, chillies and spices (chilli powder, paprika and cumin) in the olive oil until the onions begin to brown. Frying the spices allows the aromas to open up. Add the beef and fry for a couple of minutes before adding half the water, this will allow the beef to break down easier. Once the water has almost evapourated and the mince is lovely and separate add the crushed garlic, if you do not have a pestle and mortar crush the garlic on a chopping board using the salt as an abrassive, if you use the end of the knife you can flatter the cloves and crush them into a fine paste. Once the rawness has been cooked out of the garlic add the chopped tomatoes and remaining water, add the vinegar, sugar and hot sauce.
Place a lid on the pan and cook in the oven for 30 minutes. Once the 30 minutes is up add the drained kidney beans to the pan and return to the oven for a further 30 minutes.
Bring the pan out of the oven and add the chocolate, maize meal flour and soured cream. Finish with the corriander.
Serve with fluffy rice, grated smoked cheddar, soured cream, sliced cherry tomatoes, sliced spring onions, my cornbread and my guacamole.


Sunday 18 November 2012

Kaya Toast


The combination of a coconut jam sandwich and a poached egg may seem bizarre to most but in Singapore it is such a delicacy that franchises have popped up which are purely dedicated to Kaya toast. Traditionally Singaporeans eat noodle soups or rice porridge for their breakfast, Kaya toast is a dish that has been created to comfort home sick Brits missing their toast and jam whilst working in Singapore. 
 It consists of a coconut jam flavoured with pandan leaf which lends an aromatic and distinct quality to the jam. This is then spread onto generously buttered toast and served with a poached egg and soy sauce. I first tried this on my backpacking adventures and was totally blown away. I know it sounds strange but take it from me it's outstanding and the combination however unusual it may sound is heavenly. Ditch to full English or bacon sandwich and give this a try it's sublime. 

For the jam you will need:

10 Pandan leaves
400ml of coconut milk
400g of sugar
2 whole eggs and six yolks
1/4 tsp of salt
Tie the pandan leaves into a knot and place in a pan with the coconut milk and sugar, bring to a boil and reduce the heat to a simmer, simmer the milk for ten minutes and then turn off the heat. Allow the milk to stand for a further hours so that the flavour of the pandan leaves has time to infuse.
In a bowl whisk the eggs until they are incorporated and add them to the cooled flavoured milk. Place the pan back onto the heat and cook on a low heat until the mixture is very thick like mayonnaise. Add the salt and allow to cool before storing in a jam jar.
Using white bread cut the crusts off and toast one side only, butter the un-toasted side very generously and spread with the coconut jam, place the other piece of toast on top to make a sandwich. Serve with Soy sauce and a poached egg. This also works really well with a little rocket on the side for peppery bite.

Saturday 10 November 2012

The perfect Scallops


 I have made no secret of being completely obsessed with seafood, especially scallops. On a recent trip to London I visited the infamous Borough market, the very first thing I noticed was that the air was heady with the scent of garlic, butter and scallops cooking a la plancha. I purchased some fantastic quality french butter and fleur de sel with my scallop mission in mind. I know there are certain combinations that work exceptionally well with with scallops, obviously garlic is one of them, but I thought I would try to emphasise the lovely sweet flavour of the scallops without masking them. A little background warmth of chilli always goes a long way and of course fennel for an aniseed flavour. I never cook scallops in any form of liquid because I feel that they tend to stew and not fry, that is when you end up with rubbery chewy discs. This is the sort of fast food I love, it takes ten minutes to make from start to finish, serve this with crusty bread and you will never be disappointed.

You will need

1/2 kilo of king scallops with the roe on

1 1/2 tsp fleur de sel or maldon salt
1/2 tsp of black pepper
25g of garlic
50g of great quality butter (unsalted)
50g of finely chopped shallots
1 tbsp of olive oil
50g of finely chopped fennel bulb
2 tsp of chopped red chilli
1/2 tsp of lemon zest
1 tsp of lemon juice
1 tbsp of chopped chives
1 tsp of chopped fennel fronds(the top part of the bulb that looks like Dill)
Firstly season the scallops with the black pepper and 1/2 a teaspoon of the salt, remove the roes and cook them for a shorter amount of time. Crush the garlic in a pestle and mortar, using the remaining salt as an abrasive. Add the butter and the rest of the ingredients and mix well with a spoon. Place a large frying pan on the hob on a high heat, add the flavoured butter and when the butter is starting to sizzle add the scallops. You do not need to cook the scallops for any more than 2 minutes a side, the scallops should be golden on the outside and wonderfully milky and opaque within. Cook the roes for a minute either side. Serve With crusty bread.
That's it! REALLY!!

Wednesday 7 November 2012

Thai Green Papaya Salad Som Tum


If you have ever been to Thailand there is no doubting that you have tried Som Tum, green Papaya Salad. This is by far the most delicious salad I have ever tasted, and if you are trying to shift a few pounds its an absolute winner. The Thing about thai salads is they never use oil in their dressings, but what they do use to flavour their salads are some seriously aromatic components, Thai food for me hits every flavour note, salty, sweet, sour, spicy and aromatic, this dish encompasses all of those elements. 
 Som Tum is eaten everywhere in Thailand and is a firm favourite with Hawker vendors, you have to be in awe of the street food in Thailand when you compare it to the lack lustre burgers, sausage sandwiches and chips that dominate English street food culture. Each Hawker cooks one dish only and they spend their lives perfecting it. Green papaya is the unripened version of the fruit and is not something that is not easily available, you can buy them in good asian supermarkets, but you can always substitute it with carrot. I really have to urge you to try this, I lived on this salad for three months and I never got sick of it, yes maybe sometimes I asked for too many chillies but I can assure you it's truly amazing.

You will need:

I tsp of maldon salt plus 1/4 tsp
1 garlic clove
2 red birds eye chillies (be careful they bite back)
5 tbsp of brown sugar
1 lemon grass stick, the inner part only
50 g of cherry tomatoes
1 tbsp plus 1 tsp of fish sauce
3 tbsp of salted peanuts
1 large green papaya julienned 
the juice of one lime
20 sweet basil leaves
a handful of snake beans or use french beans if you cannot get snake beans, cut into inch long pieces

Firstly peel the papaya and using a julienne peeler peel until you get down to the seeds, if you do not have a julienne peeler you can always peel long ribbons and finely slice the ribbons.
In a pestle and mortar crush the chillies, garlic and lemon grass using the teaspoon of salt and the sugar as an abrasive, when you have a fine paste add the cheery tomatoes and crush very carefully, you still want to have chunks of tomatoes. 
 Add the fish sauce, lime juice and the salted peanuts, lightly crush the nuts. Add the papaya into the dressing and give it a good bruising to break down the fibrous nature of the fruit. Add the Snake beans and the basil leaves to the salad and mix well. Serve this salad with steamed sticky rice and plump pink King prawns.