Saturday 29 December 2012

Mini Smorgas torta


I love bringing a little of my upbringing and heritage to my family table, especially when I think back to my childhood Christmas's. My mother would fill a 3 metre work surface with the most glorious food both of Swedish and English decent, it was a sight to behold. We always had a lot of seafood for our Christmas starter, this was usually pickled herring or gravad lax, each of which where heady with the smell and flavour of fresh dill.

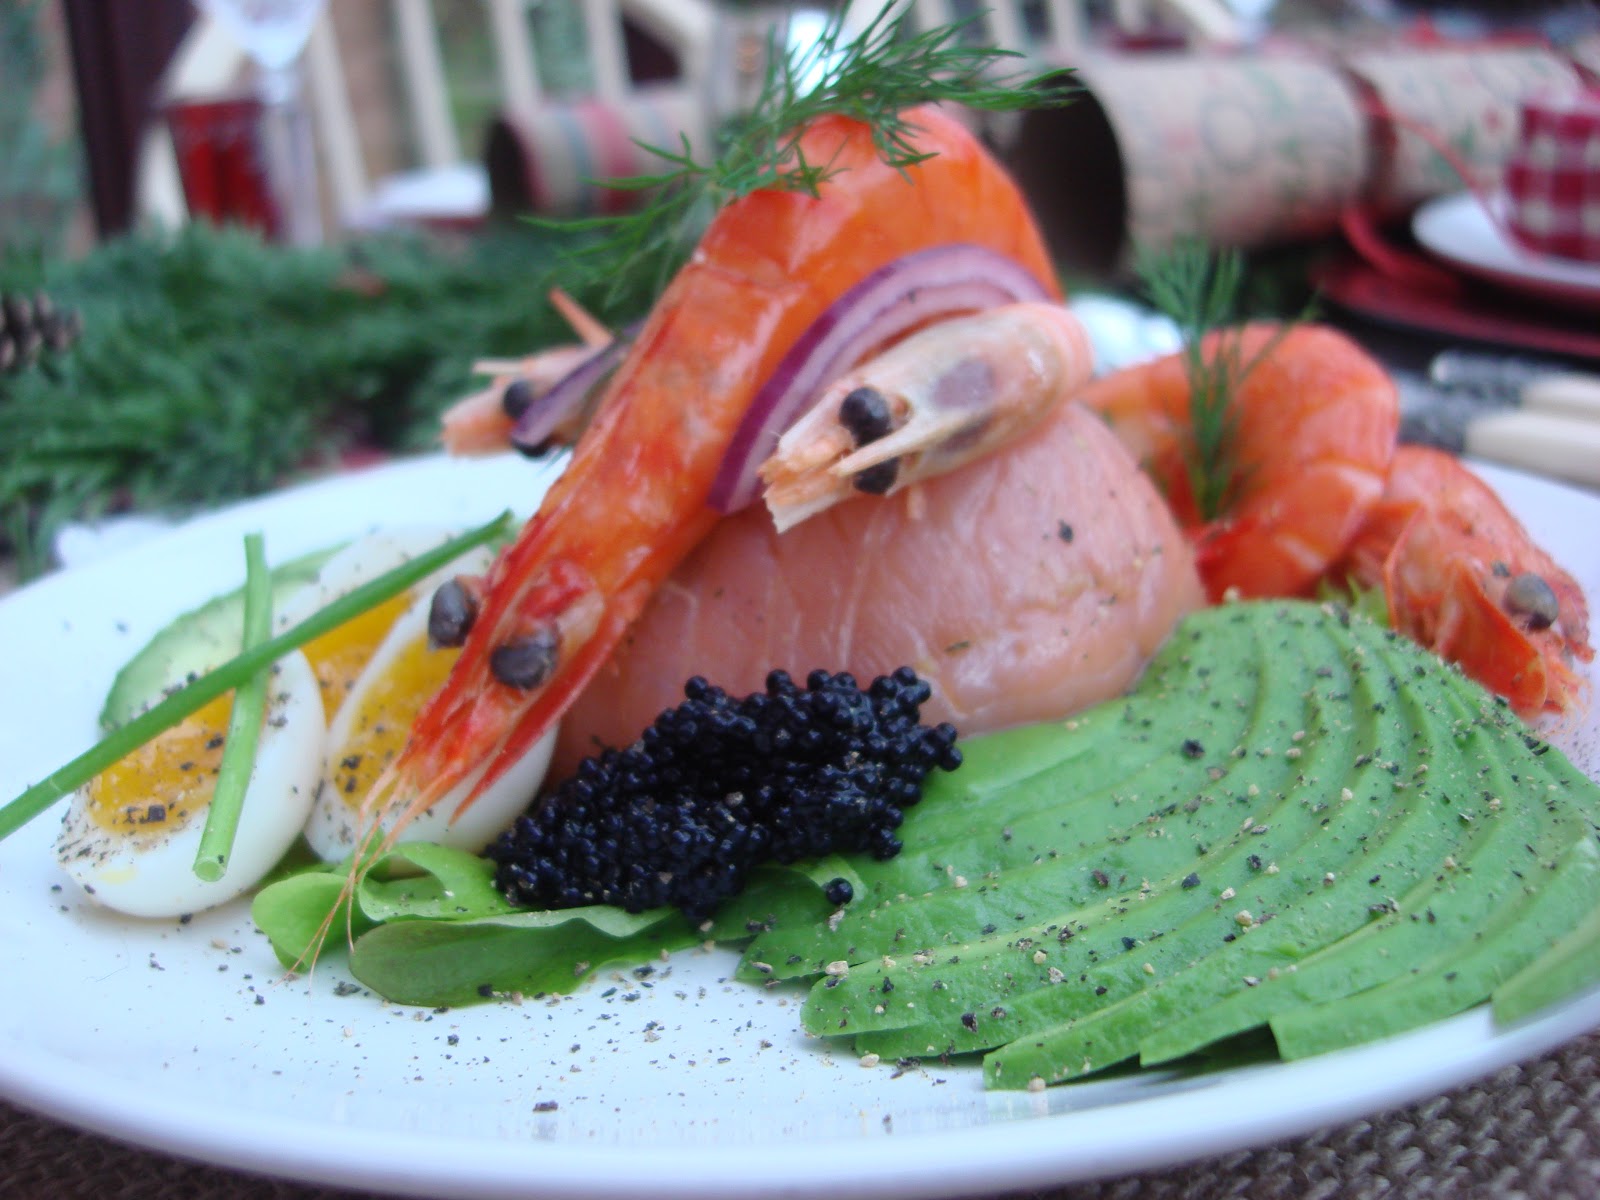
 At family celebrations my mother would make the most terrific Smörgåstårta(a savoury sandwich cake with various fillings), covered with smoked salmon, fat juicy prawns, eggs, caviar the list goes on. I decided I wanted to bring all of those lovely flavours and elements to my family Christmas, so I made a mini Smörgåstårta, which was such a success I have made it three years running. It looks cheffy and complicated but it's really simple to make and looks really impressive. The things I like the most about it is that it's cold, so there is no stressing about getting it ready on time, I make the main component the night before and decorate it on the day. This makes three towers.

You will need:

For the Smörgåstårta:
6 slices of gravad lax
4 tbsp of good quality mayonnaise
2 tsp of grated horseradish
3 tbsp of double cream
1 tsp of honey
1/4 tsp of salt
2 tbsp of dressed crab meat both white and brown
1 tbsp of chopped dill
2 tsp of chopped chives
75g of finely chopped and peeled apple
1 small gherkin (roughly 25g)finely chopped
50g of finely chopped smoked salmon
200g of shell on prawns (peeled and chopped)

To decorate each Smörgåstårta
3 large peel on crevettes (this is purely optional)
2 soft boiled quails eggs (boil for 2 minutes and rest for thirty seconds, then cooled)
a sprig of dill
black caviar (easily available and very cheap)
Fresh salad leaves to sit under the tower
a slice of lemon
a quarter of an avocado
a few slices of red onion
a few slices of cucumber
a couple of north atlantic peel on prawns

To make the filling combine all of the filling ingredients into a bowl, apart from the slices of gravad lax. Using three muffin moulds of a muffin tin, oil them and line with clingfilm. Lay the slices of gravad lax onto the mould (two slices per Smörgåstårta) and push the salmon into it so that it creates a layer of salmon with no holes. Spoon in the filling and then pull up the excess sides of the cling film to cover the top. Refrigerate overnight. Place a few salad leaves into the centre of the plate and tip the seafood tower into the centre of the leaves, un mould the cling film off the mini Smörgåstårta and begin to decorate. It is purely optional how you dress the plate using the above listed decorations. See photograph for inspiration.


Christmas Pavlova


 I'm dedicating this recipe to my wonderful family who put their money together and bought me a kitchen aid food mixer. To say that I was shocked was an understatement. I have wanted a kitchen aid for such a long time, but whenever I have tried saving for one something would always crop up and my kitchen aid fund would become an emergency fund. I was extremely overwhelmed to know that seven of my family members all put their heads together and bought me my dream present, and yes I did cry for a good ten minutes, part shock but mainly joy. It seemed only right that the very first thing that I cooked using my new contraption was a pavlova. 
 When I think of pavlova two memories are usually conjured up, one is of birthdays when I would always ask my mum to make a pavlova for me instead of a birthday cake and two is that my best friend Hayley who is Australian was also brought up on pavlova and shares my obsession, it is very common to have pavlova in place of sponge cakes. The dessert is named after the ballet dancer Anna Pavlova after her tour of Australia and New Zealand, the meringue was meant to symbolise her tutu. The main difference between a meringue base and a Pavlova is the use of vinegar in the mix that obtains a gooey marshmallowey centre that is truly addictive.


You will need:
200ml egg white or 6 large egg whites at room temperature
325g of caster sugar
1 tsp of white vinegar
2 tsp vanilla extract
2 tbsp of corn flour sifted
a pinch of salt

Preheat the oven to 160 degrees.
Whisk the egg whites and a pinch of salt together, when they begin to get foamy add a tablespoon at a time of sugar, do this gradually in a very clean bowl. When all the sugar has been whisked in add the vinegar, vanilla and cornflour. When the mixture is very thick spoon onto a sheet of grease proof or foil. Spread it into a thick round roughly 8-9 inches wide. Place on the central rack in the oven and cook for ten minutes at 160, then turn down the oven to 140 degrees c for a further 50 minutes, then turn the oven off and leave the pavlova inside until the oven is completely cool.
When the Pavlova is thoroughly cooled then you can top it with the fruit of your choice. I decided to use the left over cranberries that I had because who said that cranberries are only for savoury dishes, plus the tartness of the berry really works. Also I segmented three clementines for that seasonal touch.


For the topping you will need:
300ml of double cream
1 tbsp of icing sugar
2 tsp of vanilla extract 

This should all be whisked to soft peaks only.

For the cranberry jam:

200g of cranberries
100ml water
150g of caster sugar
the juice of a lemon
1 tsp of vanilla extract

This all needs to cook slowly in a pan until the berries resemble a thick jam, it should take 15-20 minutes. Allow to cool thoroughly before topping your pavlova. 
Place the meringue on a cake plate or platter and invert it, this just means having the bottom of the meringue facing up so you have a flat surface to spread the cream onto. Top with the cream and then the jam and clementines.


Friday 21 December 2012

The ultimate Trifle


I love a trifle when it is done right, but when trifle is not it's a total disaster. I am going to be controversial and say that I do not make a jelly I feel it ruins a good trifle, and bizarrely I do not make a custard. Stay with me folks! I replace my custard with a set panna cotta  layer that acts as both the jelly and the custard. It truly works. I have spend many years perfecting this trifle, mainly because my grandmother makes a cracking trifle, so boozy it makes you legless after one bite, but also the fact that my grandad could be the most awkward man on the planet to please when it comes to trifle, every year he has criticised  my attempts at the glorious trifle, that was until I finally did it, I made this trifle and he was silenced. RESULT!

You will need:

200g of Vanilla sponge like madeira cake (not trifle sponges)
5 tbsp of raspberry jam (I like to make my own)
2 tbsp of lemon Curd
50ml of sweet sherry
50ml amaretto
2 tbsp of framboise
2 tbsp of limoncello
50g of  crushed amaretti biscuits
2 punnets of fresh raspberry
4 deseeded and sliced nectarines
1200 ml double cream (700ml for the pannacotta, 500ml for the topping)
2 vanilla pods, split with the seeds scraped out
1 tbsp vanilla extract
1 tbsp of vanilla sugar
150g of caster sugar
1 tbsp of vanilla sugar
2 bars of green and blacks white chocolate finely chopped
5 gelatin leaves
20g of flaked almonds

Firstly place the raspberry jam and lemon curd in a pan to melt together. Place the slices of cake in the bottom of the trifle bowl then pour over the melted jam and lemon curd. Pour all of the booze into one jug and pour over the sponge, top the sponge with half of the amaretti biscuits, the raspberries and nectarines. In a pan heat 700ml of double cream with the sugars, vanilla pods and extract, cook on a medium heat until just bubbling. Place the gelatin leaves into a bowl with cold water in it so that the leaves soften and are easier to incorporate. When the cream is ready remove from the heat, add the white chocolate in immediately and stir until fully melted. When the chocolate is melted add the gelatin leaves making sure that you have squeezed out the excess water, whisk this together like crazy so that the gelatin melts into your panna cotta, this will take seconds. Pour the cream into your trifle bowl and refridgerate immediately. This will need to be in the fridge for at least 6 hours, overnight is best, but this means that all you need to do on christmas day is top it with cream. Once the pannacotta has set top off the trifle with the 500ml of softly whipped cream so that it is just holding a soft peak, I like to add a tablespoon of icing sugar and some more vanilla for flavour but it is up to you. Top the cream with the remaining crushed amaretti biscuits, the flaked almonds and for an extra treat some white chocolate curls.


Honey and mustard parsnips


I love parsnips, when they are cooked in this particular way they are unbeatable. All you need to do is peel, top and tail your parsnips, then half them or quarter them if they are huge, cut so they are all equally sized and will therefore cook evenly. In the roasting pan add a tablespoon of vegetable oil, a tablespoon of honey, a tablespoon of grain mustard and a good pinch of salt, add a couple of sprigs of rosemary and cook in the oven at 190 for 40 minutes. Keep basting the parsnips throughout the cooking process and turn them from time to time so that the parsnips do not catch and burn.

Orange scented carrots and peas


This is purely a tip of how to amplify the flavour in your carrots and peas, they don't only have to be boiled. In a large pan add a large knob of butter, roughly 50g, add the juice of a freshly squeezed orange, a tablespoon of sugar, a tsp of cracked black pepper and a large pinch of maldon sea salt. Cook the carrots first (I like to use baby carrots for that special touch), place the lid on the pan and allow to steam and cook for 10 minutes until knife point tender. Do not be concerned that the carrots will not cook through or that the carrots will fry, they will be perfectly cooked. When the carrots are cooked turn off the heat and add your frozen peas, the heat from the carrots will be enough to defrost the peas to perfection, place the lid back onto the pan and set aside until you need them. 
Perfect!

Cranberry sauce (how it should be)


Homemade Cranberry sauce cannot be beaten, there is nothing better than a huge dollop of the fruity stuff on your Turkey, or better yet smothered over your christmas left overs and lodged between to slices of crusty bread. Cranberry sauce is the most important condiment for the Great British Christmas dinner in my opinion. The very curious think about cranberry sauce is that everybody likes their cranberry sauce differently, my Grandfather likes it made with less sugar and very tart, my mother likes it with an orangey background flavour. I haven't written a specific recipe, more a blueprint to your own taste buds that you can adapt to your families palate. Cranberry sauce is insanely easy to make and so much more rewarding than opening a jar.

You will need:

The zest and juice of two oranges (zest first then juice)
125g of caster sugar
1 tsp of all spice
250g of frozen cranberries
a pinch of salt
a tsp of triple sec

Mix all of the above ingredients together in a pan, place a lid on the pan and cook on a medium heat for 10-15 minutes, until the cranberries have broken down. If you prefer your cranberry sauce sweeter add a tablespoon more of sugar until you reach the right level of sweetness.

Bacon and Chestnut brussel sprouts


I recently saw Ina Garten roast her brussells sprouts and though it was a great idea, all vegetables take on a natural sweetness when roasted, so I decided to test it out. I removed the outer leaves of the sprouts and made sure that the sprouts were clean. Place the sprouts in a roasting tray and roast them for 15-20 minutes until only just tender. In a large saucepan add 50g of butter and fry 100g of pancetta pieces, when the pancetta is browned add 100g of chopped chestnuts (you can get them ready prepared) and then add the sprouts and toss well. Season with a good pinch of sea salt and serve.

Friday 14 December 2012

Honey and mustard Chipolatas


The problem with Most Christmas dinners is that more time and care is spend over the Turkey or roast meat of choice other than the sides, so often the vegetables and accompaniments are flavourless and over cooked. I feel that every component that makes up our traditional dinner should be as tasty as the star of the show, a Christmas chipolata should not only be a sausage wrapped in bacon, but should be as important as the rest the meal. I always take the time to make sure that every element of the entire dinner from the turkey to the humble sprout is packed with flavour. The good news about these chipolatas is that they can be cooked in the oven the day before and simply re-heated and browned on the day.

You will need:

12 good quality pork chipolatas
12 rashers of streaky smoked bacon
1 tbsp of wholegrain mustard
1 tbsp of runny honey
1 tbsp of vegetables oil
2 sprigs of fresh rosemary
Wrap each sausage in a rasher of bacon and place into a roasting tray (use a disposable foil tray because then you have no washing up to do). In a bowl mix together the honey, the mustard and the oil. Pour this over the sausages. Finish by stripping a couple of rosemary stalks and scattering it over the sausages. Toss the sausages well so that they are fully covered. Cover the tray with foil so that the sausages do not colour and cook in the oven for 30 mins at 190 degrees. If you want to eat the sausages immediately remove the foil at the 30 minutes and cook for a further 10 minutes. If you want to prep them the day before you can take them out after the half an hour, on Christmas day, uncover them and cook them with the roast potatoes for 15-20 minutes.

Thursday 13 December 2012

Tarragon and fennel stuffing


 Sometimes it's nice to switch things around a little. Tarragon is one of those lovely herbs rich in aniseed flavour, it always works so well with poultry. I know that Sage and onion has become synonymous with the Christmas dinner, but I want to put it out there that you don't have to follow convention, sometimes breaking the rules can work and in this case I know it does. Stuffing does not have to be daunting, and it does not have to be that very well known brand that most succumb to. I always cook my stuffing separately, if you stuff the turkey with a sausage stuffing you can guarantee that by the time the stuffing is cooked the breast is dry, and also when you cook the stuffing separately you achieve a wonderful crust on the outside that would not get by trying to cook the stuffing inside of the bird. I have used Sicilian sausages in this stuffing because it is flavoured with fennel seeds that compliments the tarragon and aniseed flavours really well. Have a go at making your own stuffing, it is well worth the effort.

You will need:

1 fennel bulb finely chopped
3 chopped shallots
50g of butter
300g of fresh white breadcrumbs
20g of fresh tarragon
1200g of  de-skinned sicilian sausages

Start by frying the shallots and fennel in the 50g of butter and cook on a medium heat until softened. Once softened set aside to cool. In a bowl mix the de skinned sausages (they have to be sicilian sausage flavoured with fennel seed) with the cooled shallots and fennel, mix the breadcrumbs through carefully, followed by the tarragon. Decant the stuffing into a roasting tray roughly 20cm x 30cm pressing it down until it is even. Cook in the oven for 45 minutes at 190 degrees c. If the top begins to brown too much cover with tin foil.


Wednesday 12 December 2012

Perfect Roast Potatoes


Despite Turkey being the star of the show at Christmas, roast potatoes are undeniably the most popular vegetable accompaniment in the traditional Christmas dinner. It always makes me chuckle that so many chefs will come up with inventive ideas to achieve the perfect roasty, but the format to achieving a fluffy inside and a crisp exterior is actually very easy to do. I have watched a lot of people try and fail to cook a decent roast potato, and what I have always found is that most people tend to use too much fat in the roasting tray, believe it or not by using as little oil or fat as humanly possible will result in a crunchier crust. My potato of choice is always a desiree potato, they have a wonderfully fluffy texture but are not a wet potato. 
 I always use either goose fat or duck fat as it imparts flavour and has a higher smoking point. There is no specific recipe for roast potatoes, it is purely a technique.
Firstly I peeled 2kg of desiree potatoes and cut the potatoes into four if you prefer smaller roasties or into three if you prefer a larger roast potato.
I parboil the potatoes in water with a couple of tablespoons of salt in it, this is to give the potato flavour right the way through. Once the potatoes have boiled for 10 minutes, drain them immediately, leave the potatoes to sit for a further ten minutes so that the water has had a chance to evaporate. Place the potatoes back into the emptied pan and whilst placing the lid onto the pan shake the potatoes vigorously to rough up the outer layer of the potato. Place the duck fat into a pan and melt it, using a slotted spoon dip each potato into the melted fat and place onto a roasting tray, I call this the dip and dunk technique. Be careful not to overcrowd the tray so that you can allow the potatoes to crisp up evenly. Cook the potatoes in the oven for 35-45 minutes at 190 degrees c. This will feed 4-6 people.
They will be perfect.

Tuesday 11 December 2012

The Perfect Roast Turkey


The Perfect meat
So here it is, the big one, the meal that strikes fear in the heart of every cook throughout the nation, the Traditional Christmas Dinner. In England we are led to believe that the Turkey is a tricky bird to cook and that it needs cooking for half the day for it to be edible, I'm blogging to set the record straight about Turkey and how it should be prepared and cooked, if you follow this recipe there is no way you can fail to impress your family and friends this festive season. I know that for most people Turkey is never eaten throughout the year, though it is the meat of choice for Christmas day, I have never understood why it is only cooked on Christmas day, we eat turkey a lot in our family, especially my Grandmothers turkey, I'm very lucky that my Grandmother cooks a mean turkey which is never dry, I have used her method for the cooking process but have created a way to guarantee that the bird has flavour throughout all of the flesh, not just on the skin.
        

In America they have  the cooking of a turkey down to a fine art, and what they never ever do it over cook the bird, there is no need to cook a turkey for as long as we all think. First of all start by using a great quality bird, free range always helps and if the turkey has a good layer of fat that will impart much needed flavour and moisture. I started with an 11 pound bird, which will feed 6 people happily, with plenty of left overs.


The Fundamentals of a Turkey:
  • Buy a good quality bird
  • Do not get the largest bird, go for a moderately sized bird
  • Do not remove the legs EVER!
  • Make sure you flavour the bird before the day of cooking
  • Try to think of the Turkey as a large chicken
  • Do not stuff your turkey
  • However long Delia says you should cook your Turkey for deduct an hour from the time
  • Leave the turkey to rest under foil for minimum half and hour, but 45 minutes is perfect
  • Cook your Turkey upside down on the breast, this is so the fat from the undercarriage will run down to the bottom of the breast meat and retain moisture.
2 days before Turkey time
I made a highly flavoured brine that will season the bird throughout and will ensure that the breast meat is moist. Here is how I did it:
The turkey in the brine

Step one the brine
You will need:
1 bottle of dry white wine
3 pints of water
100g of salt
100g sugar
1 tbsp of fennel seed
1 sliced fennel bulb
1 white onion
2 chopped carrots
3 sticks of celery
1 bunch of chopped tarragon
1 orange sliced in half and the juice squeezed into the brine
a bouquet garni of fresh mixed herbs, rosemary, bayleaf, thyme and parsley
2 tsp of whole peppercorns

Add all of the above ingredients into the largest pot or bucket you can find and allow the turkey to sit in the brine in a fridge for 48 hours.

The day of cooking
Step two The butter
Tarragon butter
The Turkey ready for the oven

You will need:
2 Garlic cloves (finely crushed using the salt as an abrasive)
2 tsp of salt
150g of unsalted butter
3 tsp of honey
2 tsp of dijon mustard
4 tablespoons of freshly chopped tarragon
the juice of half a lemon

In a pestle and mortar crush the Garlic until it is a fine paste and mix in the other ingredients until the butter is fully incorporated. Remove the turkey from the brine and dry the skin with kitchen paper, using your middle and index finger to separate the skin from the meat so that you have created a pocket for the flavoured butter to sit, try to go carefully so that you do not tear the skin. Place the butter under the skin and push the butter around the breast until the butter is distributed in an even layer.


first 15 mins


Use some of the vegetables from the brine and place them in a heavy duty roasting pan and then position the Turkey onto the trivit of vegetables breast side up to start with.
After being turned
Cook the turkey for half and hour at 190 degrees c, then turn the bird over onto the breast and cook for a further 1 hour and 45 minutes at a reduced heat of 170 degrees c. Remove from the oven and turn back over so the the breast is facing up and return to the oven for 15 minutes at 190 degrees c fo that the skin can brown. Remove from the oven and allow to rest for 45 minutes whilst covered in foil. If you can make an incision where the leg and breast meets and the juices run clear it is perfect.